
At Guelph Concrete LTD, we’ve been proudly serving the Guelph, Ontario community for over 15 years, providing top-notch concrete solutions.
Waterproofing a cinder block foundation is one of our specialties. Here’s how we expertly handle the process:
First, we assess the foundation for cracks, leaks, and water damage. Then, we carefully excavate around the foundation and inspect for any hidden issues. After thoroughly cleaning the walls, we repair any damaged areas with hydraulic cement.
To ensure added durability, we apply a parge coating. Once that’s completed, we meticulously seal the foundation surface with a high-quality waterproofing membrane. For extra protection, we can also install a drainage system and a sump pump. Regular maintenance and inspections are essential to keep your foundation in top shape.
For a professional touch and peace of mind, contact Guelph Concrete LTD for a free estimate. Call us today at 548-490-2074. Let our experienced team handle your waterproofing needs!
Assess Foundation Issues
Let’s start by examining our cinder block foundation for cracks, leaks, and water seepage to determine the extent of waterproofing required. First, we need to create an inspection checklist to make sure we cover all common issues.
Look closely for any signs of mold, mildew, or moisture damage on the interior walls. These are warning signs indicating areas that may need immediate attention.
Next, we should check for efflorescence—those white, powdery residues on the foundation walls. These mineral deposits suggest water penetration. It’s essential to identify these spots as they guide us towards potential problem areas.
Don’t overlook the grading around our foundation either. Water should flow away from the cinder block walls, so let’s evaluate if the grading is sufficient to prevent water accumulation.
Another vital aspect of our foundation assessment involves inspecting the mortar joints between the cinder blocks. Any deterioration here can serve as entry points for water infiltration.
By identifying these common issues early, we can explore various waterproofing options suitable for our needs. Remember, taking the time to thoroughly assess our foundation now will save us from bigger headaches down the road.
Let’s get started!
Excavate Around Foundation
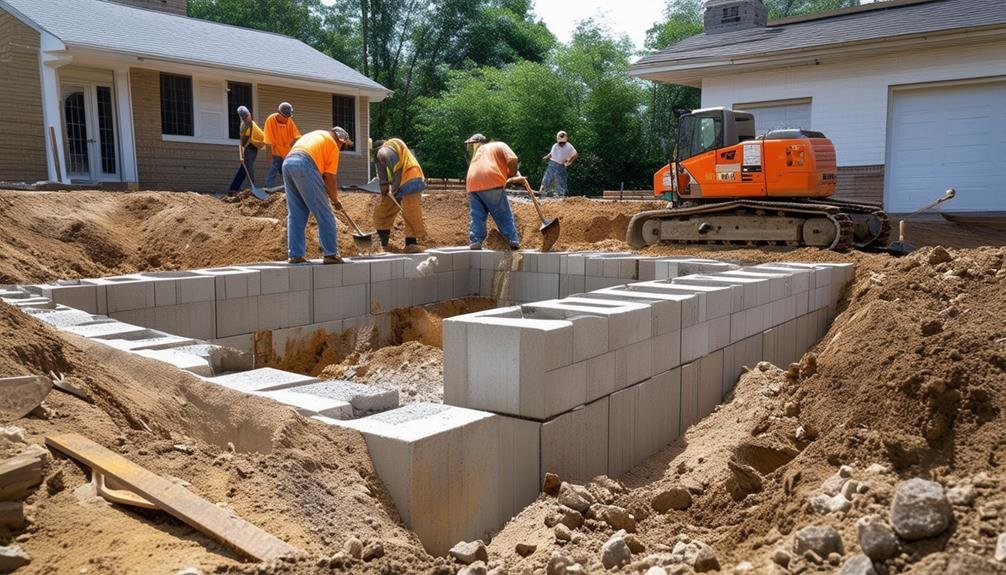
Having thoroughly assessed our cinder block foundation for issues, we now need to excavate around the foundation to expose the walls for waterproofing. This involves digging a trench to the appropriate excavation depth, which will allow us to inspect the foundation for any cracks, leaks, or signs of water intrusion.
To ensure our excavation is effective, we need to contemplate soil compaction and drainage solutions. Proper soil compaction will prevent future settlement issues, while effective drainage solutions will help mitigate water pooling around the foundation. Here’s a quick guide to help us through the process:
| Step | Description |
|---|---|
| 1. Mark Area | Outline the area around the foundation where we’ll be digging. |
| 2. Dig Trench | Dig down to the foundation’s base, making sure the trench is wide enough for easy access. |
| 3. Inspect | Examine the exposed foundation for any damage or water intrusion. |
| 4. Prepare | Prepare the area for applying waterproofing products by smoothing out the trench. |
Clean Foundation Walls
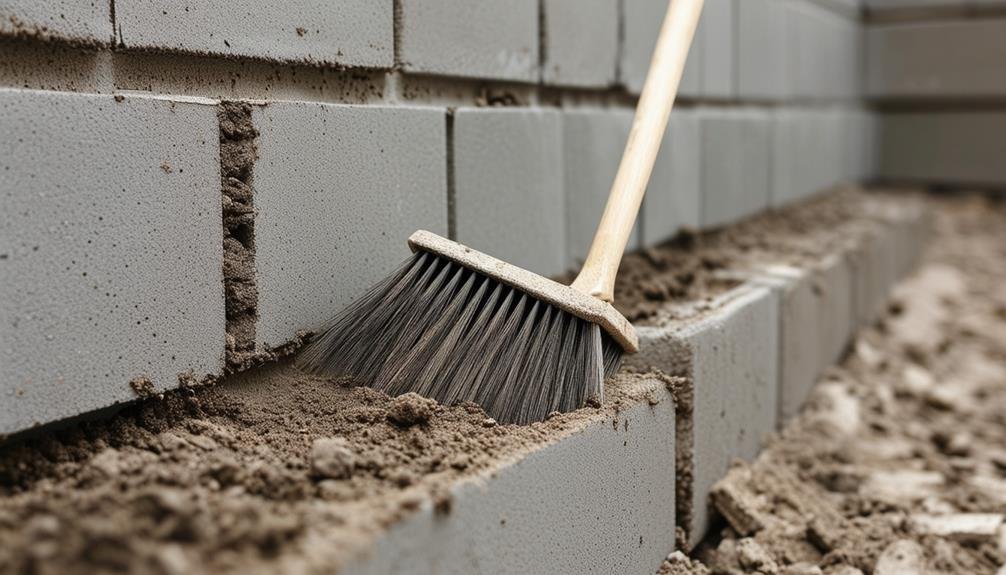
Before we apply any waterproofing products, we need to thoroughly clean the cinder block foundation walls to make sure they adhere properly. This step is essential for achieving a long-lasting water barrier.
Let’s start by removing any dirt, debris, and old waterproofing materials from the surface. A power washer works wonders for this task, blasting away grime and loose material efficiently. If you don’t have a power washer, a sturdy wire brush can be just as effective, although it might take a bit more elbow grease.
Surface cleaning doesn’t just prepare the walls for waterproofing products; it also reveals any cracks, holes, or damaged areas we might need to address later. Pay close attention to these as we go along. By ensuring the walls are spotless, we create an ideal surface for the waterproofing products to bond with, which greatly enhances their effectiveness.
Make sure every inch of the foundation is thoroughly cleaned. This might seem like a meticulous task, but trust us, it’s worth the effort. Clean walls are the cornerstone of a successful waterproofing project, ensuring our work stands the test of time and keeps our homes dry.
Repair Damaged Areas
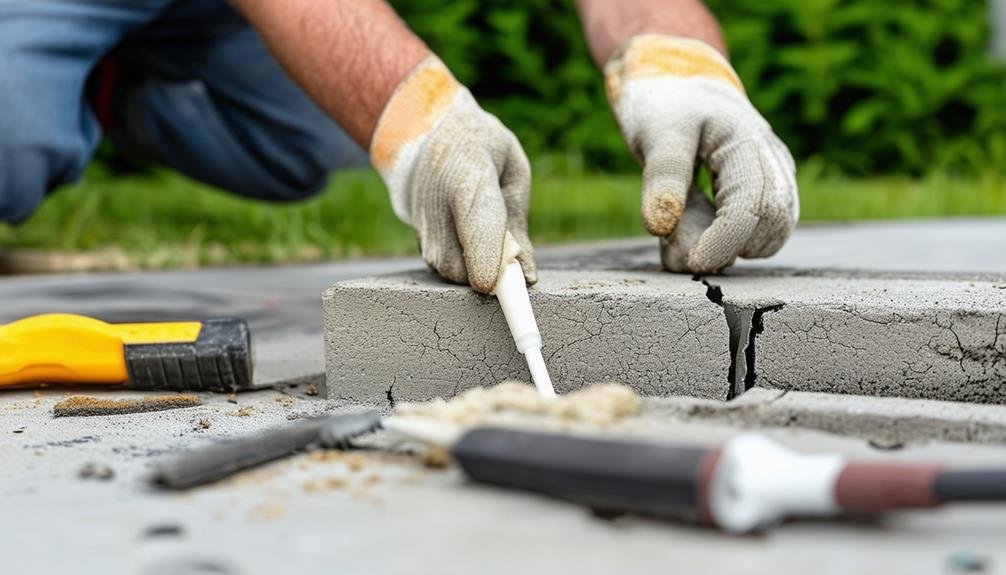
To secure our waterproofing efforts are successful, we must first repair any damaged areas of the cinder block foundation using hydraulic cement, which effectively stops water leakage. This step is vital as it sets the stage for more advanced waterproofing techniques and guarantees that our foundation repairs are robust and long-lasting.
First, let’s identify all the cracks and damaged sections. We’ll clean these areas thoroughly to remove debris and dust, which helps the hydraulic cement adhere better. Using a wire brush can be particularly effective for this. Once the surface is prepared, we mix the hydraulic cement according to the manufacturer’s instructions, ensuring a quick setting time to efficiently address the cracks.
Next, we apply the hydraulic cement to the damaged areas, pressing it firmly into the cracks to ensure a complete seal. Proper crack sealing is crucial for preventing future water intrusion. After the cement has dried, we inspect the repairs to make sure no gaps remain.
These initial foundation repairs lay the groundwork for the next steps in our waterproofing solutions. By addressing these damaged areas first, we create a solid foundation that will better resist water and bolster the overall effectiveness of our waterproofing efforts.
Apply Parge Coating

Now, let’s talk about applying the parge coating to your cinder block foundation.
At Guelph Concrete LTD, with over 15 years of experience serving Guelph, Ontario, we start by preparing the surface meticulously, ensuring it’s clean and free from any damage.
Our expert team then mixes Portland and masonry cement to create a durable coating. This coating is applied smoothly to level the surface and fill any air voids, ensuring a flawless finish.
Ready to enhance the durability and appearance of your foundation? Contact Guelph Concrete LTD today for a free estimate.
Call us at 548-490-2074.
Parge Coating Composition
Let’s immerse ourselves in the basics of mixing Portland and masonry cement to create the perfect parge coating for your cinder block foundation. This blend not only levels the surface and fills air voids but also offers numerous parge coating benefits. It’s an essential step that enhances the durability and waterproofing effectiveness of your foundation.
To make sure we get the mix right, follow these steps:
- Gather Materials: You’ll need Portland cement, masonry cement, clean water, and a mixing container.
- Mixing Ratio: Combine one part Portland cement to two parts masonry cement. This ratio ensures a strong, durable coating.
- Add Water: Gradually add clean water to the mix while stirring continuously. The consistency should be similar to thick peanut butter.
- Application: Apply the mixture evenly over the cinder block foundation using a trowel.
Surface Preparation Steps
Having our parge coating mix ready, we should prepare the cinder block foundation surface meticulously to ensure the coating adheres properly and performs its intended function.
First, let’s thoroughly clean the surface by removing any dirt, dust, or loose debris. We can use a stiff brush and water for this task, ensuring that no particles are left that could hinder adhesion.
Next, inspect the cinder block walls for any cracks or significant gaps. These should be filled with a suitable patching compound and allowed to dry completely before proceeding. The importance of surface smoothness can’t be overstated, as a uniform surface enhances the parge coating benefits, ensuring a seamless layer that fills air voids and levels the foundation.
One of the most common mistakes is neglecting to moisten the wall before applying the parge coating. A slightly damp surface helps the coating bond better, reducing the chances of cracks and ensuring even coverage.
Additionally, we need to take drying time into account carefully. After applying the patching compound, let’s give it adequate time to dry before moving on to the parge coating application, as rushing this step could compromise the integrity of our waterproofing efforts.
Application Techniques
To apply the parge coating effectively, we’ll start by making sure our mixture is well-prepared and ready for use. We’ll need a combination of Portland cement and masonry cement, which provides the durability and strength necessary for a reliable waterproofing barrier.
Here’s a step-by-step guide to get us started:
- Mix the Parge Coating: Combine Portland cement and masonry cement according to the manufacturer’s instructions. Make sure it’s thoroughly mixed to achieve a smooth consistency.
- Apply the Base Layer: Using a trowel, spread a thin layer of the parge coating onto the cinder block foundation. This base layer should be about 1/8 inch thick.
- Level the Surface: Smooth out the coating, filling in any air voids or gaps between the cinder blocks. This step is essential for creating a uniform surface.
- Finishing Touches: Apply a second layer if necessary, making sure it’s even and smooth. Allow the coating to cure properly, following the recommended drying times.
Seal Foundation Surface

At Guelph Concrete LTD, with over 15 years of experience serving Guelph, Ontario, we know the importance of a properly sealed foundation surface.
Let’s get started by ensuring it’s clean and dry; any cracks should be sealed with hydraulic cement to prevent future damage.
We then apply a high-quality, below-grade waterproofing membrane using a brush or roller for even coverage.
Remember, allowing the membrane to properly cure is key for long-term protection.
For a free estimate on your foundation sealing project, contact Guelph Concrete LTD today at 548-490-2074.
Let our expertise give you peace of mind.
Surface Preparation Techniques
Preparing the cinder block foundation surface is necessary for a successful waterproofing project, ensuring we achieve a strong and efficient seal. Let’s jump into some practical tips on how to get the foundation ready for waterproofing.
First, we need to clean the cinder block foundation thoroughly. Dirt, debris, and old sealants can prevent proper adhesion of the waterproofing products. To make sure the surface is clean, use a wire brush or a pressure washer. This will remove loose particles and contaminants, promoting better sealant penetration.
Next, addressing any visible cracks or damage is vital. We should repair these imperfections before applying the waterproofing sealant to create a seamless barrier. This step ensures we don’t miss any spots where water could seep through.
Applying a concrete bonding agent or primer follows. This enhances the adhesion of the exterior coatings we’ll be using, ensuring long-lasting protection. Make sure to let the primer dry completely before moving on.
Here’s a quick checklist for surface preparation:
- Clean the surface:
- Use a wire brush or pressure washer.
- Repair cracks or damage:
- Ensure a seamless barrier.
- Apply a bonding agent or primer:
- Enhance adhesion.
- Allow primer to dry:
- Achieve best adhesion and efficiency.
With these steps, we’re setting the stage for a successful waterproofing project!
Sealer Application Methods
With the surface prepared, we can now focus on applying the sealer to the cinder block foundation for optimal waterproofing. First, we’ll use a long nap roller to guarantee an even sealer coverage. This type of roller is ideal because it can reach into the texture of the cinder blocks, providing a thorough application.
As we roll the sealer onto the foundation, it’s important to work methodically, covering every inch of the surface. Don’t rush—take your time to make sure no spots are missed.
Once the first layer is applied, we should let it dry completely. The drying process is essential for creating a sealed barrier and usually takes around 24 hours, depending on the product and weather conditions.
After the first coat has dried, we’ll apply a second layer of sealer. This enhances the waterproofing efficiency by filling in any tiny gaps we might’ve missed initially. Again, use the long nap roller to apply this layer evenly.
Allow the second coat to dry thoroughly as well—this guarantees maximum protection.
Long-term Protection Tips
To guarantee long-term protection of your cinder block base, it’s necessary to consistently maintain the sealed surface and address any emerging issues promptly. Keeping our foundation in top shape ensures a dry, safe, and robust home environment.
Here’s a detailed guide on how to achieve this:
- Regular Inspections: Check the foundation periodically for cracks or signs of wear. Early detection allows us to apply waterproofing products quickly, minimizing potential damage.
- Apply Multiple Coats: Don’t skimp on the sealer. Multiple coats enhance the effectiveness of the waterproofing process. Use a long nap roller to ensure thorough coverage. This method ensures that all nooks and crannies are sealed, reducing the risk of water intrusion.
- Ensure Proper Drying: After applying each coat of foundation sealer, allow adequate drying time. This step is crucial for a durable and long-lasting seal. Rushing this process might compromise the seal’s integrity.
- Use Parge Coating: Applying a parge coat with Portland and masonry cement can level the surface and fill air voids. This extra layer of protection strengthens the foundation against moisture penetration.
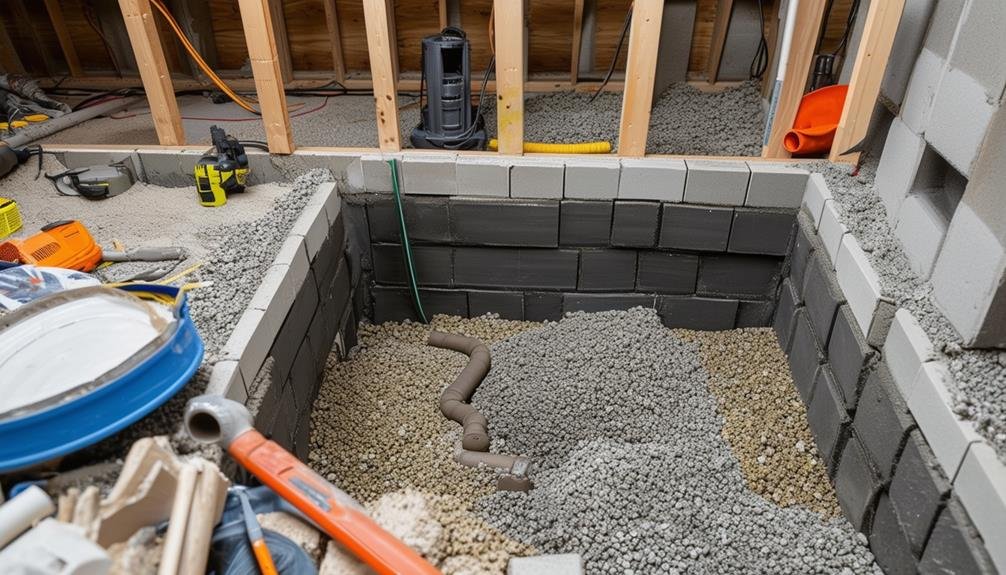
Install Drainage System
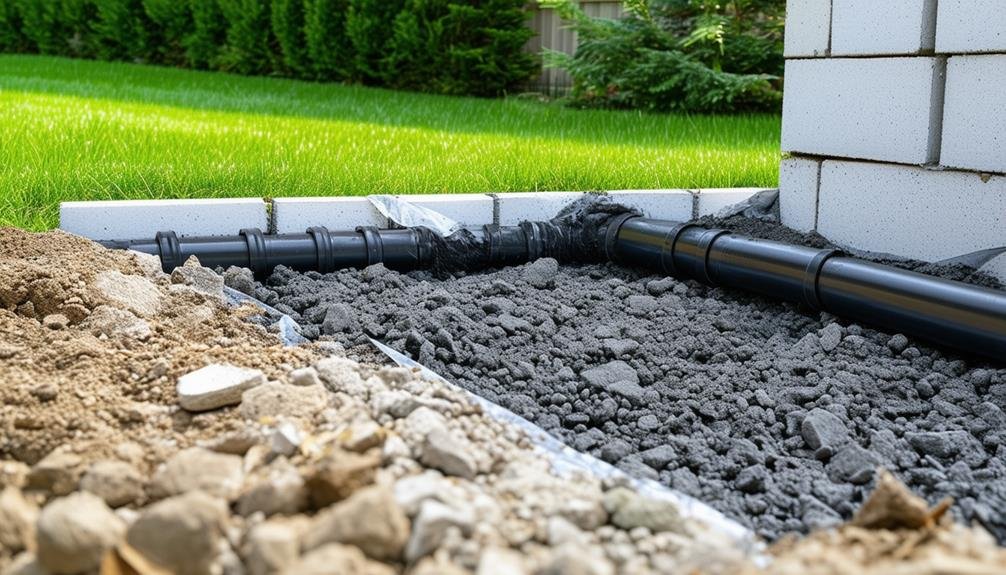
One important step in waterproofing a cinder block foundation is installing a well-designed drainage system to efficiently direct water away from the structure. The benefits of a drainage system are numerous; it helps manage water flow, prevents water infiltration, and reduces the risk of basement leaks. To achieve this, we start by excavating around the foundation to properly address water issues.
Proper installation is key. When done right, it ensures effective waterproofing and offers long-term protection against water damage. This is where the importance of professional installation comes in. Experts understand the complexities involved and can tailor the system to our specific needs, ensuring peak performance. They’ll make sure that every component, from the drain tiles to the gravel layer, is correctly placed.
We’ve got to remember that a well-executed drainage system isn’t just a short-term fix, but a long-term solution. It keeps our basements dry and our foundations strong, fostering a sense of security and belonging in our homes.
Sump Pump Installation
After setting up a robust drainage system, we should focus on sump pump installation to manage water accumulation and prevent basement flooding effectively. A sump pump is important in keeping our cinder block foundations dry, especially in Guelph’s unpredictable weather.
To get started, here are four key steps we need to follow:
- Choose the Right Pump: Selecting the appropriate pump is essential. Look for one with a high-capacity motor and a reliable float switch. Don’t forget to check for a durable pump basin.
- Professional Installation: While DIY options exist, professional installation ensures the sump pump is accurately positioned and connected to the drainage system. It also guarantees compliance with local codes.
- Backup Systems: To safeguard against power outages, we should invest in a battery backup system. This guarantees our basement remains dry even during electrical failures.
- Ongoing Pump Maintenance: Regular pump maintenance is important. Inspect the pump, clean the basin, and test the float switch periodically. This not only prolongs the pump’s life but also ensures it operates efficiently when needed.
Incorporating these waterproofing solutions into our foundation strategy will give us peace of mind and a safer, drier home.
Maintenance and Inspection

Regular upkeep and examination of our cinder block foundation are vital to detect potential issues early and safeguard the longevity of our home. We need to be proactive about foundation maintenance to avoid costly repairs down the road. Here are some practical tips to keep in mind:
First, let’s conduct visual examinations regularly. Look for cracks, efflorescence, or signs of water damage. These can be early indicators of more serious problems. Also, check for proper drainage around the foundation. Confirming water is directed away from our cinder blocks helps prevent water infiltration.
Next, we should look for signs of mold or mildew. These could suggest water infiltration and poor waterproofing.
Finally, scheduling a professional examination annually is essential. A professional can evaluate the condition of our cinder block foundation more thoroughly and address any concerns promptly.
| Task | Frequency | Purpose |
|---|---|---|
| Visual inspection | Monthly | Detect early signs of cracks or water damage |
| Check drainage | After heavy rains | Confirm proper water direction |
| Professional inspection | Annually | Comprehensive assessment and prompt repairs |
Frequently Asked Questions
What Is the Best Waterproofing for Block Foundation?
The best waterproofing methods for block foundations involve exterior waterproofing, which includes excavation, parge coating, and sealing. While DIY can save costs, hiring professionals guarantees a thorough job that prevents leaks and prolongs foundation life.
How Do You Waterproof a Block Foundation From the Outside?
Did you know that 98% of basement leaks originate from external water sources? To waterproof a block foundation from the outside, we’ll excavate, clean, repair, parge, seal, and incorporate drainage solutions, ensuring a dry, secure home.
How to Seal Cinder Block Basement Walls?
Let’s tackle sealing cinder block basement walls together. For interior solutions, we can use DIY methods like applying a waterproofing paint or sealant. Don’t forget to repair any cracks first and guarantee proper drying time for effectiveness.
What Is the Membrane for Block Foundation?
Did you know 98% of foundation issues stem from water? For block foundations, membrane options include rubberized asphalt or polymer-modified bitumen. The installation process involves applying the membrane directly to the exterior cinder block surface.
Conclusion
To sum up, waterproofing a cinder block foundation in Guelph, Ontario is a detailed but manageable process. Did you know that almost 60% of homes with foundation problems face water seepage?
By following these steps:
- evaluating issues
- digging
- cleaning
- fixing
- applying parge coating
- sealing
- installing a drainage system
- setting up a sump pump
we can safeguard our homes.
Let’s remember routine upkeep and inspections to keep everything in excellent condition. Together, we can guarantee a dry, robust foundation.